
Mini-Aquaponic
Single Bottle System 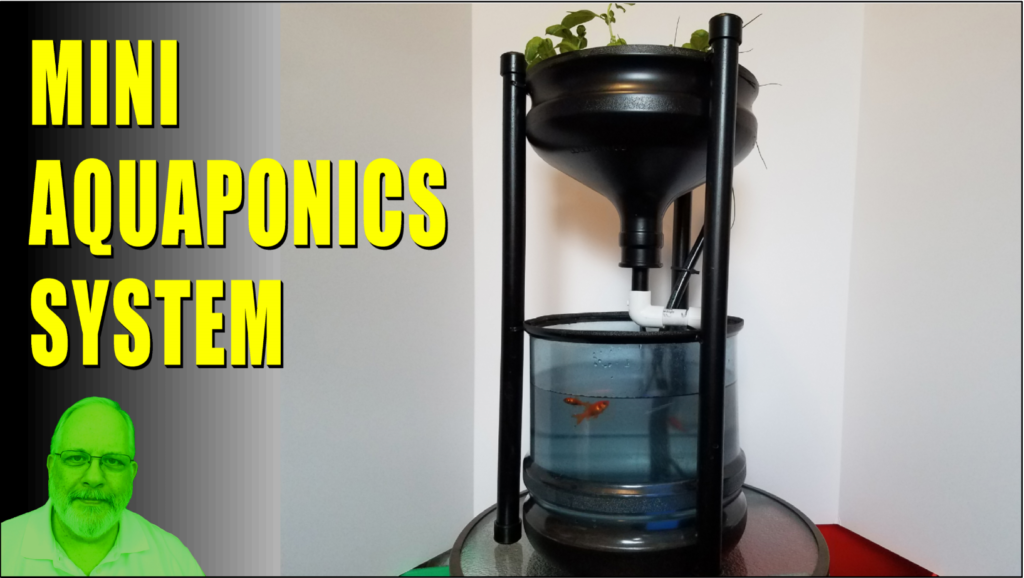
& Vertical Tower Mini-Aquaponic System
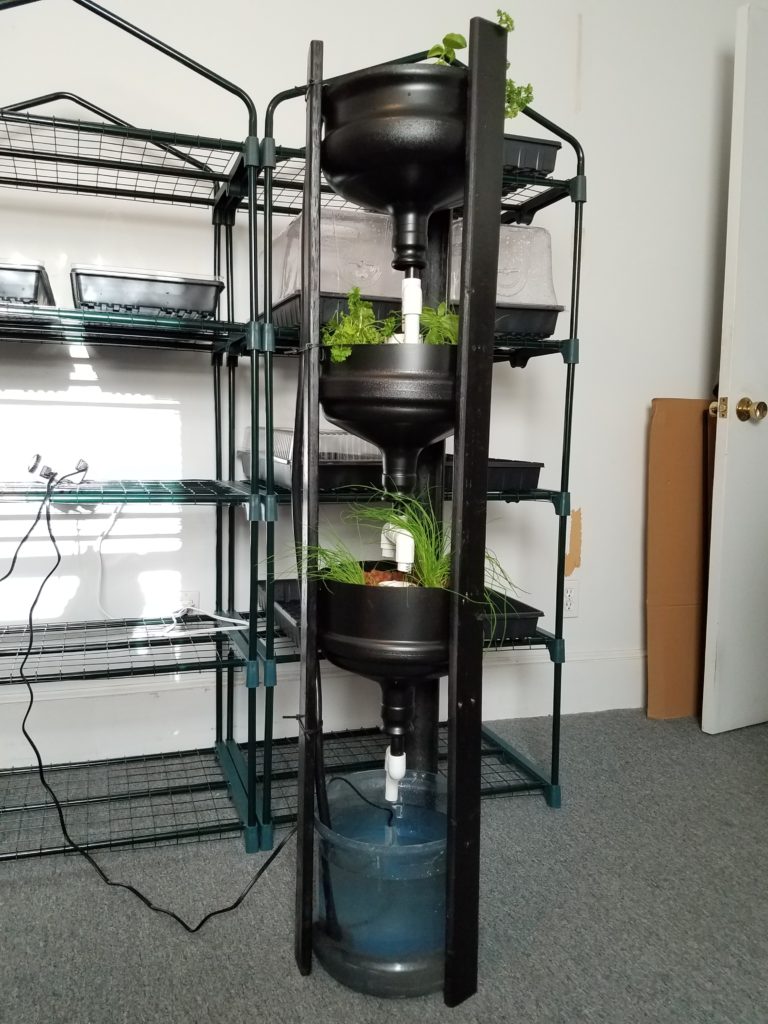
Here’s the plans for “both” systems: Mini-Aquaponics: Single Bottle System and Vertical Tower
I’d appreciate it if you could subscribe to my YouTube Channel to help us grow.
You’ll find a complete video on this Mini-Aquaponic System there as well.
Thanks for visiting
![]()
Mini Aquaponics Two Bottle System
with Bell-Siphon Plans

Here’s the plans for this system: Mini-Aquaponics – 2 Jug System
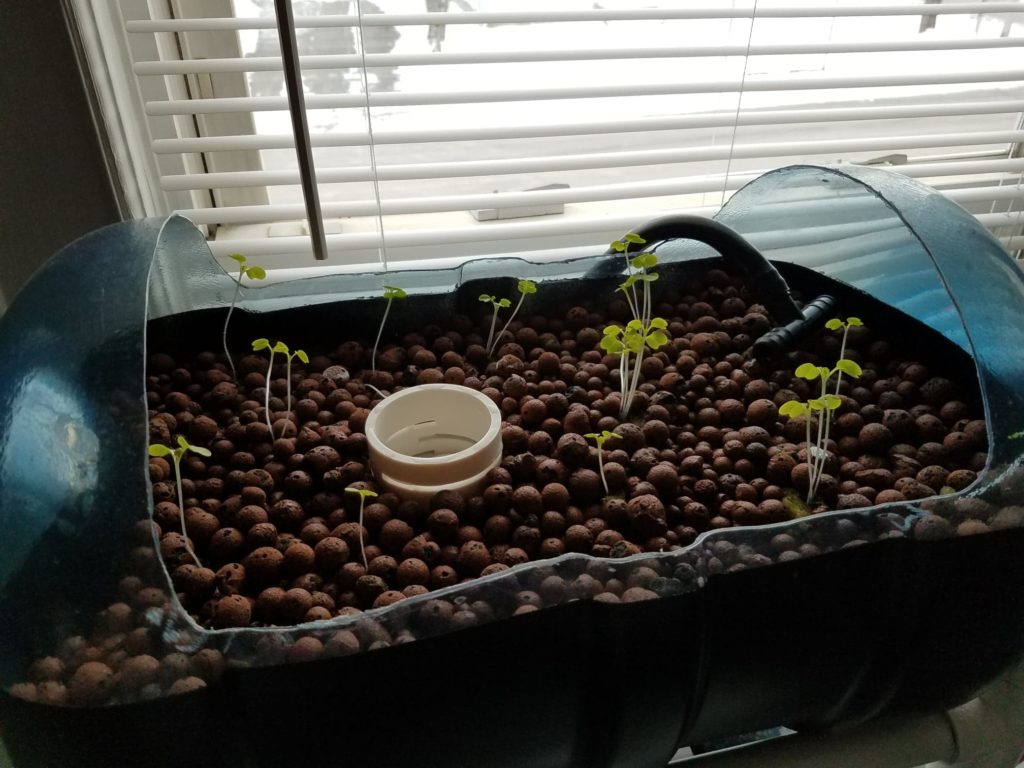
Started growing mini Pak-Choi in it about two weeks ago…
I’d appreciate it if you could subscribe to my YouTube Channel to help us grow.
You’ll find a complete video on this Mini-Aquaponic System there as well.
Thanks for visiting
.![]()
My NFT Hydroponic System Plans
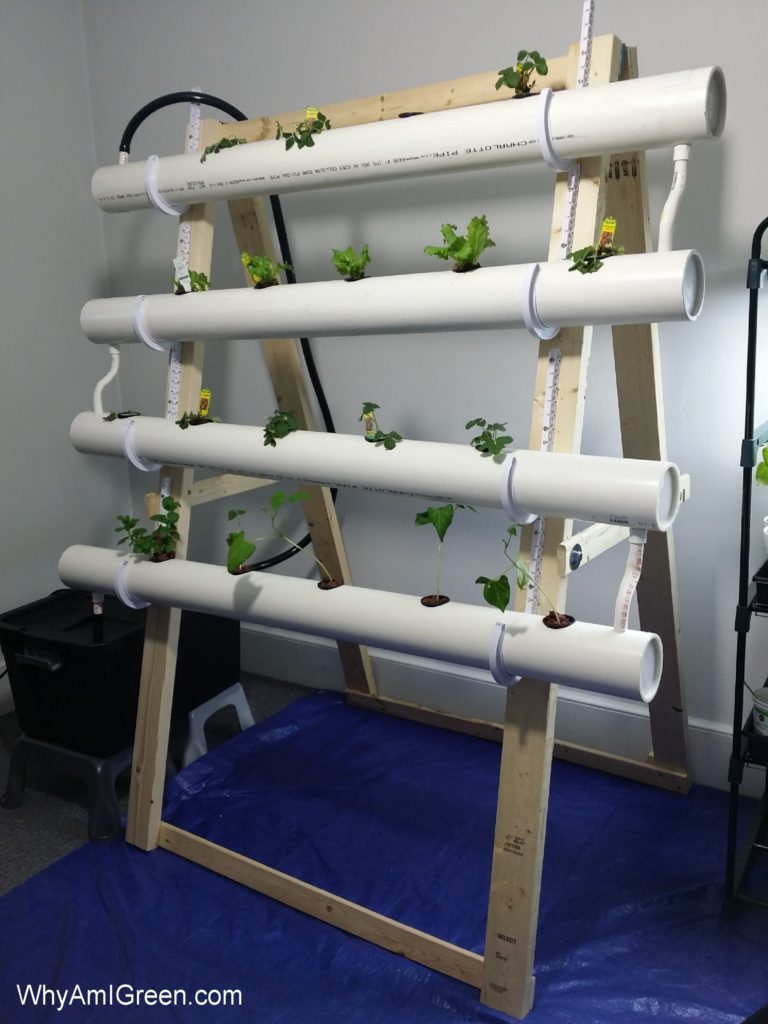 Here’s the plans for this system: NFT Plans
I’d appreciate it if you could subscribe to my YouTube Channel to help us grow.
You’ll find a complete video on this NFT System there as well. Thanks for visiting
.![]()
Plywood Cold Frame Plans
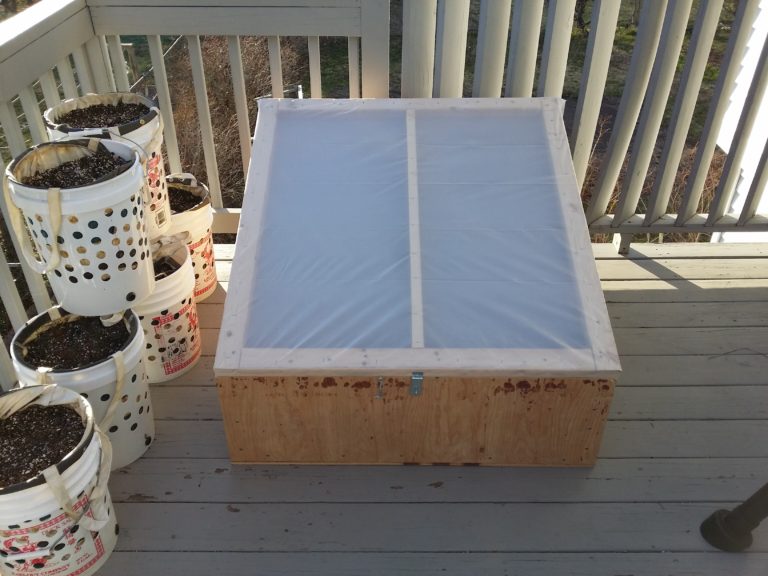
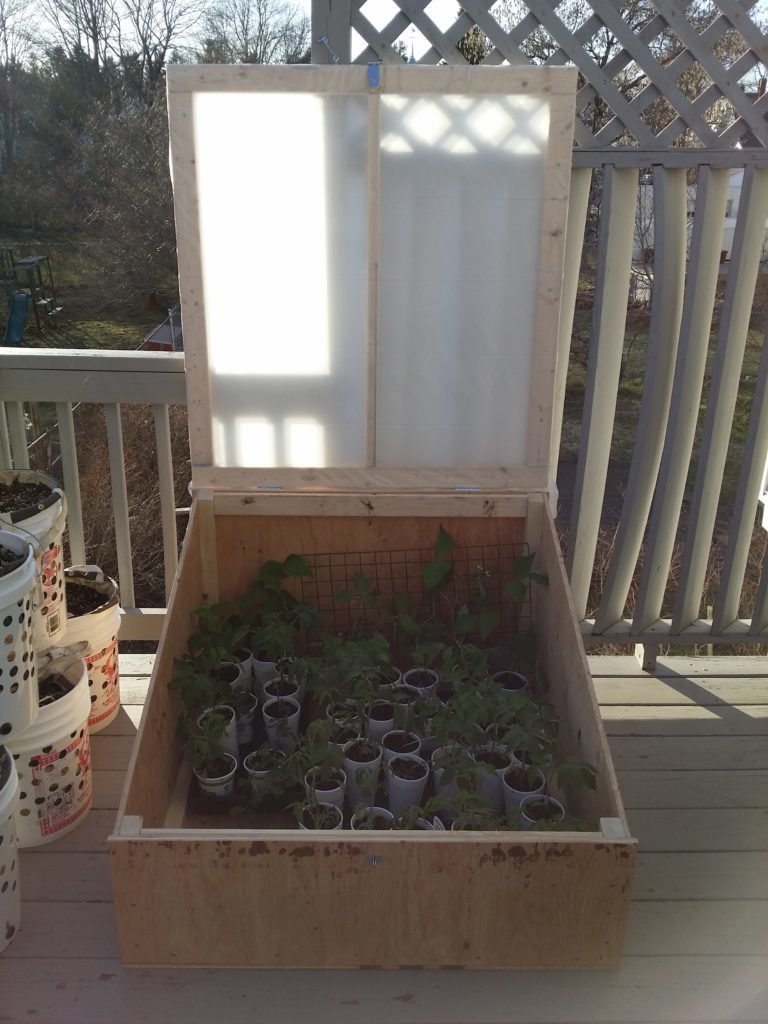
Here’s the plans for this system: Cold Frame Plans
I’d appreciate it if you could subscribe to my YouTube Channel to help us grow.
You’ll find a complete video on this Cold Frame Setup there as well. Thanks for visiting
** If you have any comments, additions or information to improve the plans please let me know in the comments below. Also if you just want to say hey… 🙂
![]()
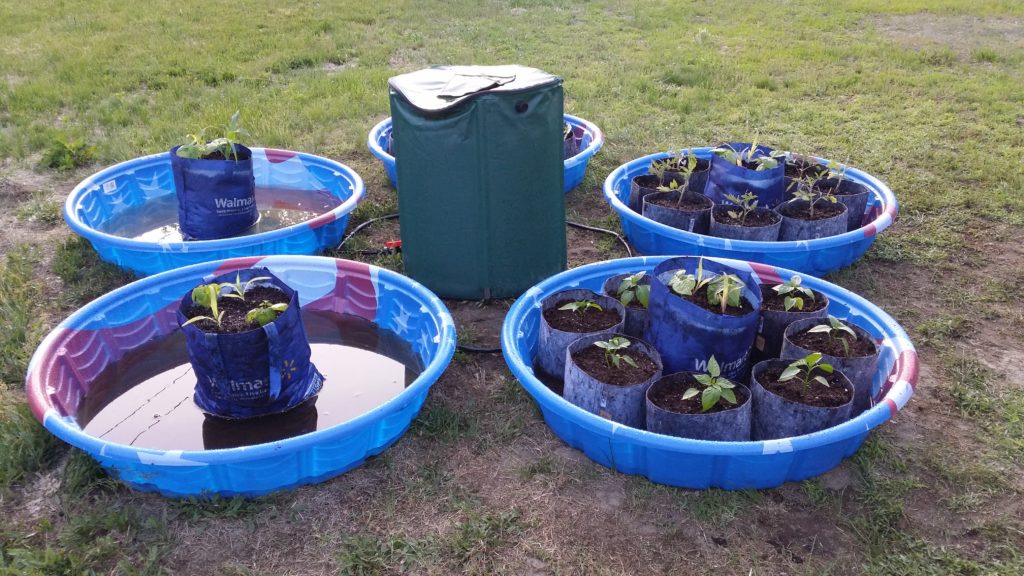
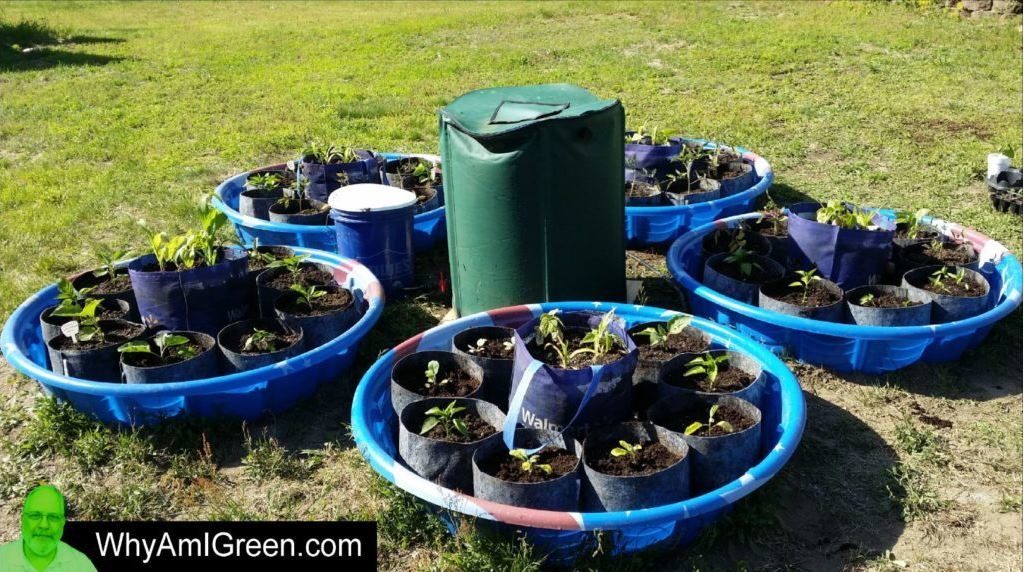
Automatic Watering Kiddie Pool System

5 Pools with over 80 plants –
“That’s almost more organic veggies per square foot than the grocery store!”
Rather than making plans for this one I’ll include videos, pictures and drawings filling in the blanks as I go.
(Video showing the system – see the followup video at the end to see the Update)
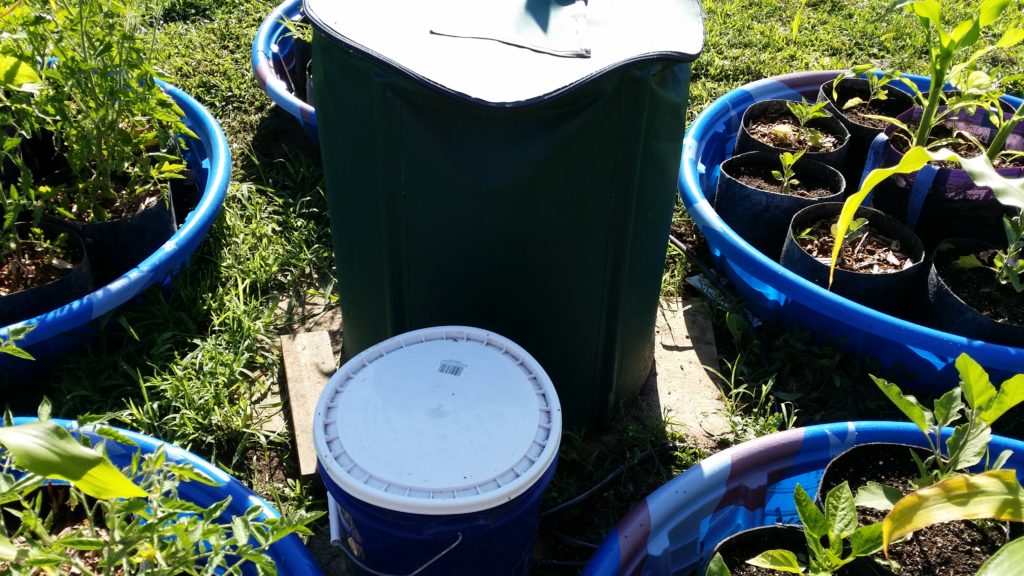
This was an awesome system that I set up at a remote location about 5 miles from my home. I only had to come and fill the 50 gallon collapsible barrel in the middle with water once every 2 – 3 weeks during the summer. Pretty much self sustaining.
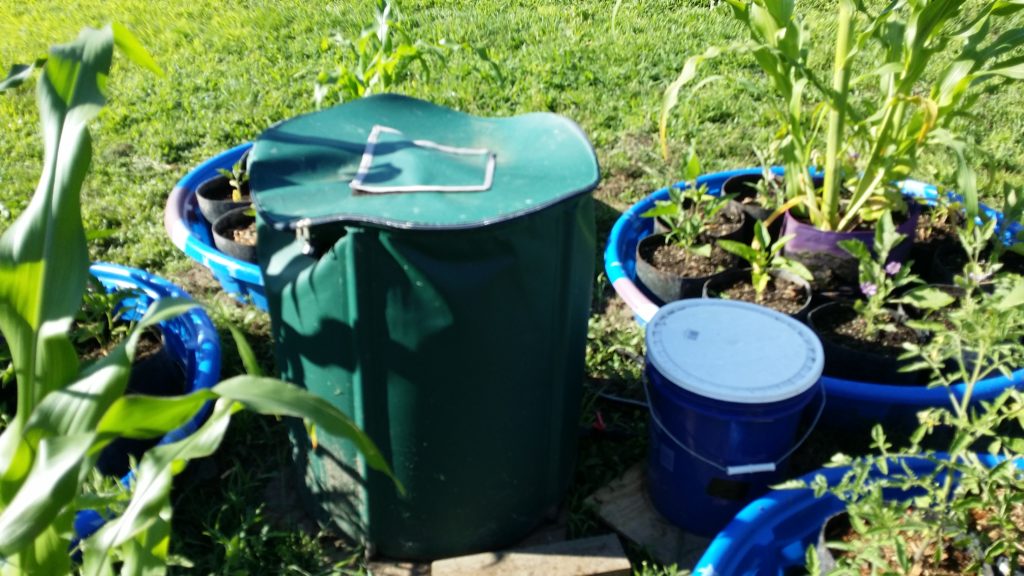
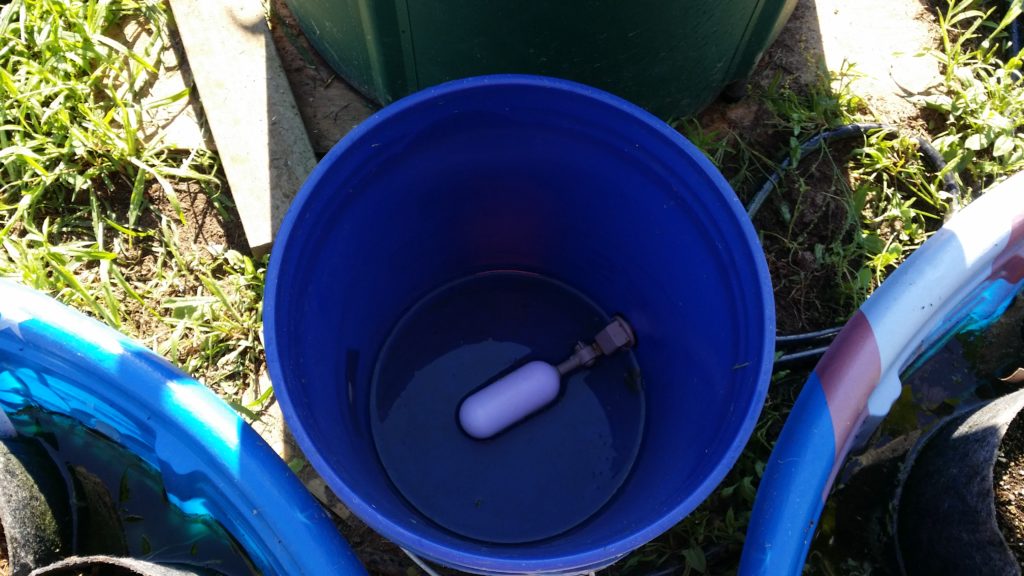
Top left: 50 gallon bucket for reservoir. Top right: 5 gallon bucket for float assembly. be sure to keep this covered to prevent algae. I have the float set to allow about 1 1/2″ of water. This is the same amount of water that will go in all the pools in everything is level. If you need less water in the pools you can simply put a shim of wood under the reservoir bucket to raise it rather than re-adjusting the entire system.
Water flows into the blue bucket from the reservoir, through the float mechanism and then out another tube and hole going to the nearest pool.
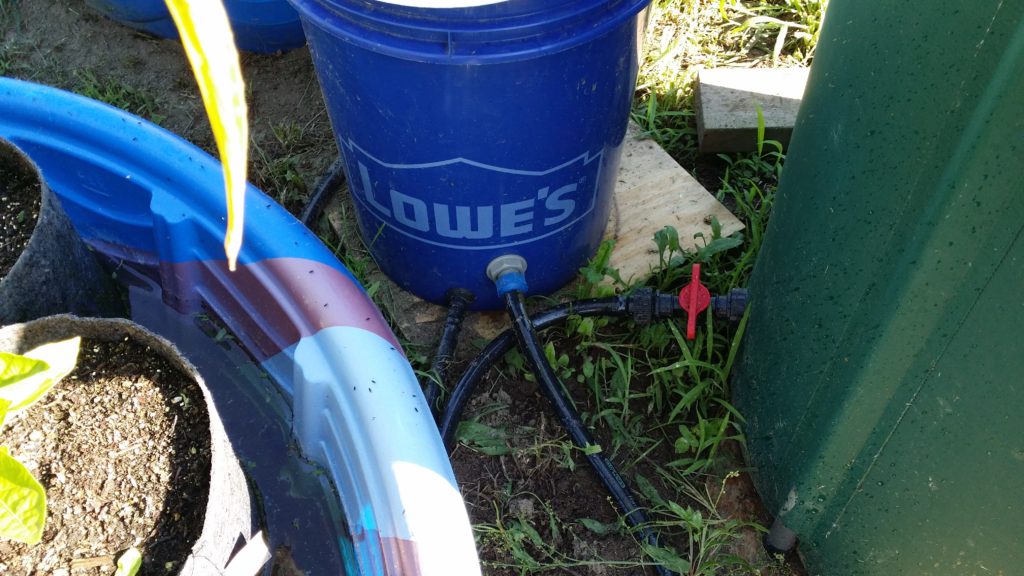
Each pool has a 1/2″ plastic t-fitting to connect to the plastic hose from the reservoir so the water can go into each pool and move onto the next one.
I drilled a small hole in one of the pools on the opposite sides from the overflow bucket about 2 – 2 1/2 inches from the bottom as an overflow incise it rains a lot. We don’t want a flood!
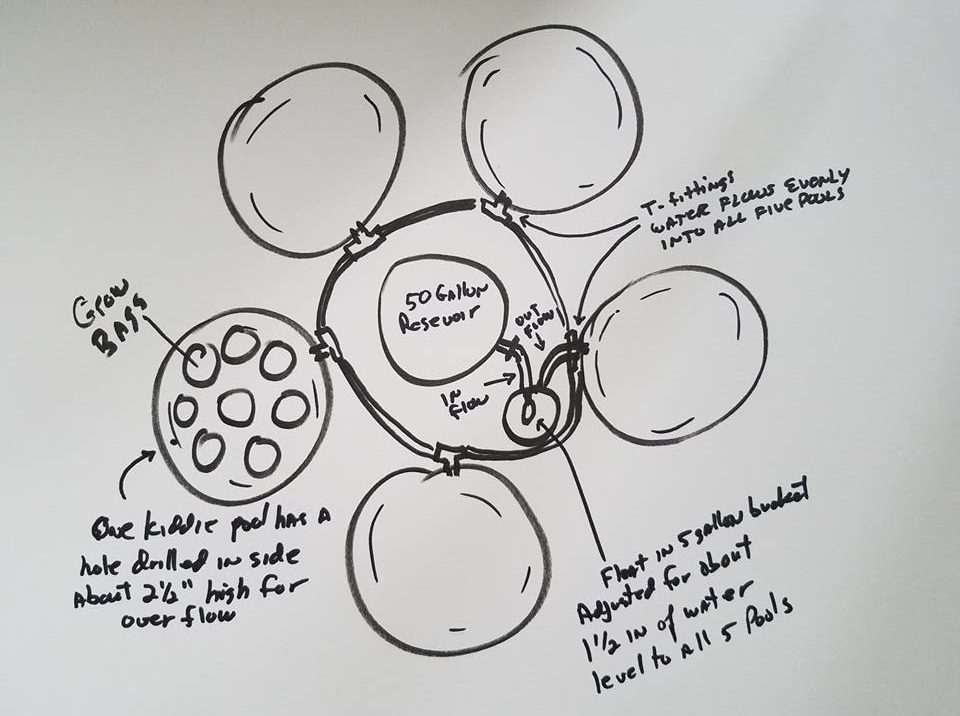
Here’s a rough drawing of how everything works. I know it looks like a Picasso but it’s really mine! 😉
I initially placed 9 grow bags in each pool until they started to grow and had to cut them down to 7 – 8 bags depending on the size of the plants. I took the extra plants home to my other kiddie pool system but you can add additional pools to this system as needed anywhere along the line. Just make sure it’s also level.
Every two to three weeks I came over and filled the reservoir with water to top it off. Once it was full I placed the hose in one of the pools directly and let if flow for about 20 minutes to flood it. this circulated fresh water through all the pools and drained out the overflow.
If you have problems with mosquitoes you can use mosquito dunks in the pools or simply fill in the pools between the grow bags with Hydroton Pebbles or pebbles. The water will still flow through but the mosquitoes will not be able to get into the water.
I also had several frogs that set up shop in my pools which helped the mosquito control. They vanished in the Fall as mysteriously as they showed up in the Spring.
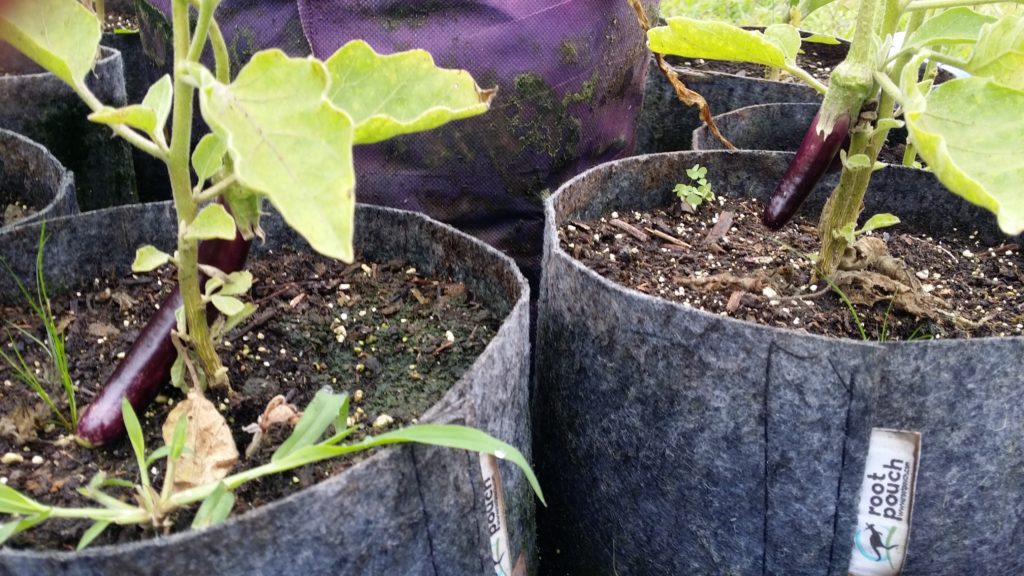
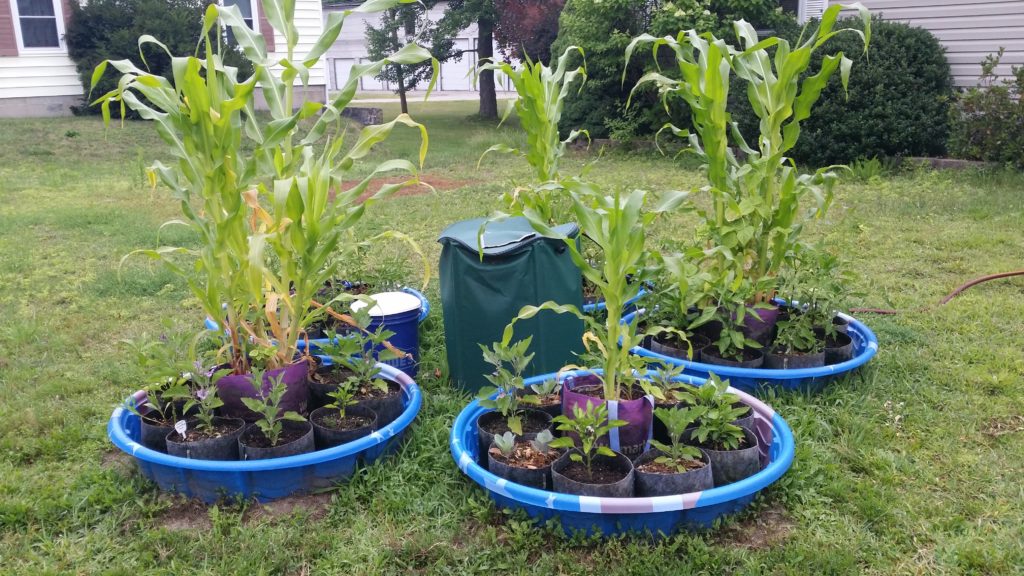
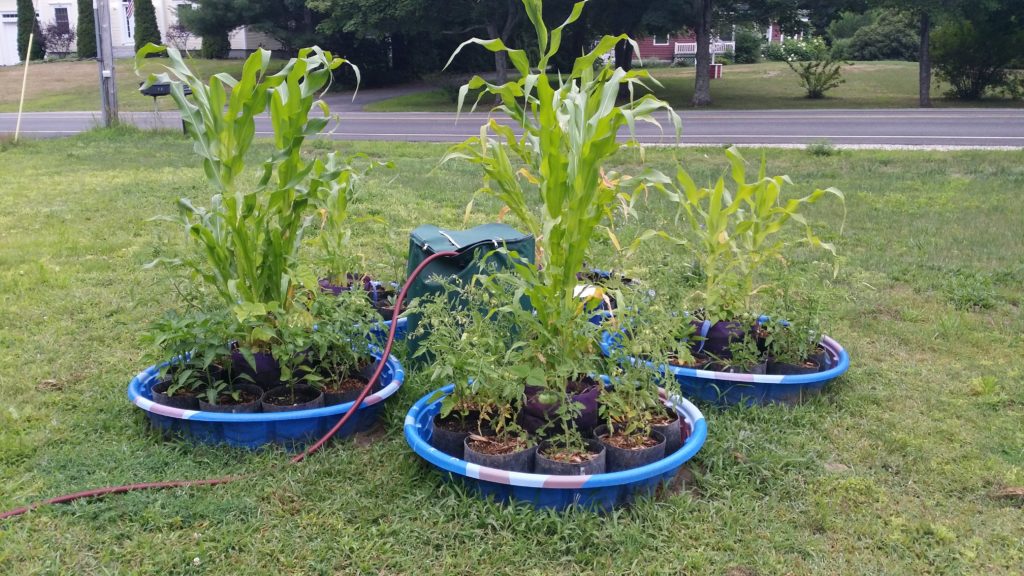
Top left: The beginning stages of my European Eggplants. Top right: I combined corn and string beans in the center grow pot of each pool for shade, because they seem to grow great together and it looked really cool from the street when they got to be about 8 ft tall. The beans like to climb the corn and really produced great.
I was able to save the pools and bags for next year so the expense to set up will be much lower.
Additional Info: I used to buy my grow-bags on Amazon (VIVOSUN 5-Pack 5 Gallon Grow Bags) and they’re all pretty good with similar prices but now I make all my own from landscaping cloth.
Here’s a great video showing how to make your own grow-bags which I do now: https://www.youtube.com/watch?v=vq3aBghgGfo&t=3s.
Here’s my recipe for great wicking soil (I use 5 gallon buckets as measuring cups lol)
- 2 five-gallon buckets of Peat Moss
- 1 five-gallon bucket of cow manure or compost or worm castings
- 1 ½ cup of garden lime
- ¼ bucket (of a 5 gallon bucket) of Perlite
- Handful of Epsom salt
- Sometimes I ad in blood meal or other things I may have around to raise the calcium or potassium levels a bit.
- Anything around that mix should work for you.
The idea is to have enough peat moss to absorb / wick the water up from the bottom so at least 60 – 75% Peat should do it plus whatever else you need for your specific veggies.
Anything about wicking mixes or soil you can find your answers from Larry Hall’s site at: https://www.youtube.com/channel/UCVnDfVS8raCaGEM0BOypsLg He’s a great resource and an authority on the topic.
** If you have any comments, additions or information to improve the plans please let me know in the comments below. Also if you just want to say hey… 🙂
![]()
Automatic Watering Garden by Capillary Wicking Action
Capillary Action: You can use this process if you need to leave your plants behind for a few days or for a complete system. Easy to set up and remove.(watch the video above for information)
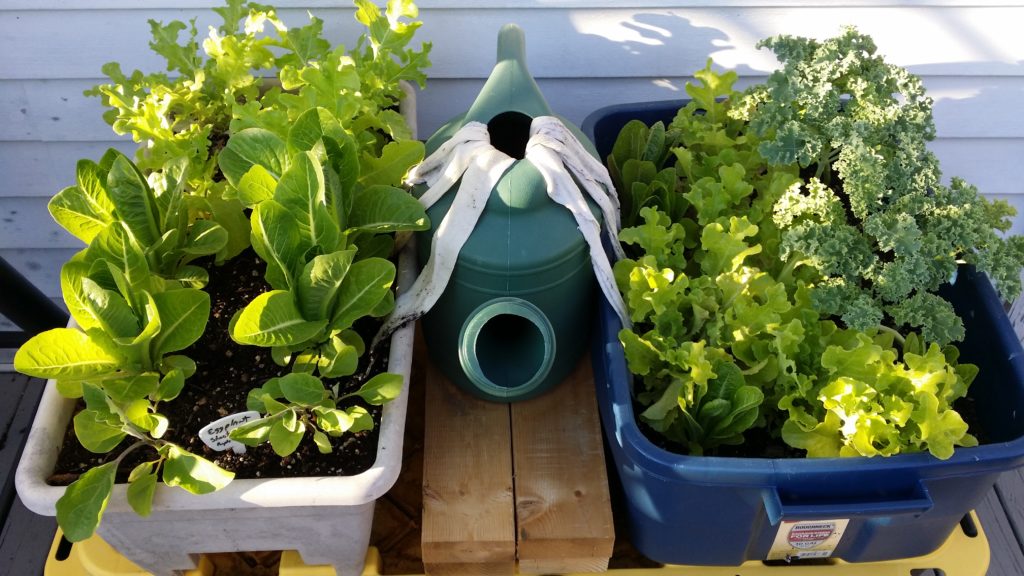
This is one of the most amazing systems I’ve ever don in the way of super fast and colossal growth! This picture was taken about a week after the video above. So…
My natural progression was to try this on a larger scale and introduce it into an extra Kiddy Pool I had lying around. ( I did put a bucket cover on the top of the bucked to keep mosquitoes out but did not seal it. Just set it on top and it worked fine)
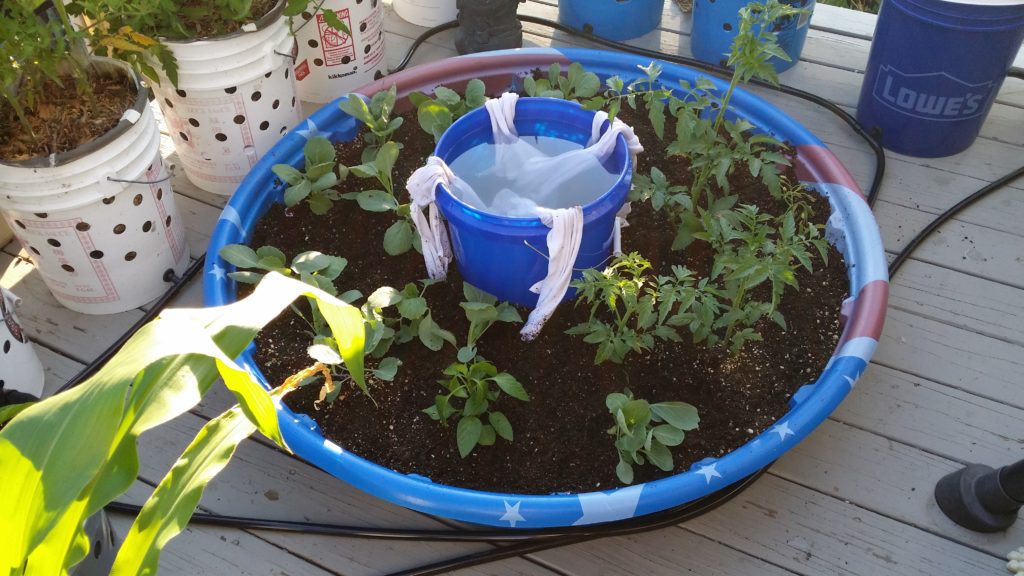
So here’s what happened: If you can see the pool in the below picture (it’s in the rear, right side) The plants grew like crazy but got so big they they started crowding our everything. I had to remove half the cabbage and transplant my tomatoes downstairs as they we growing in JUNGLE conditions.. They grew in so full that I couldn’t see the soil anymore.

Second problem was that I used torn up cotton t-shirts strips for the capillary wicking vehicle when I should have sued something more substantial such as bath towels. The strips began to break down after a few weeks and actually fell apart under the soil which stopped the wicking process. Luckily I caught it and tore up more shirts!
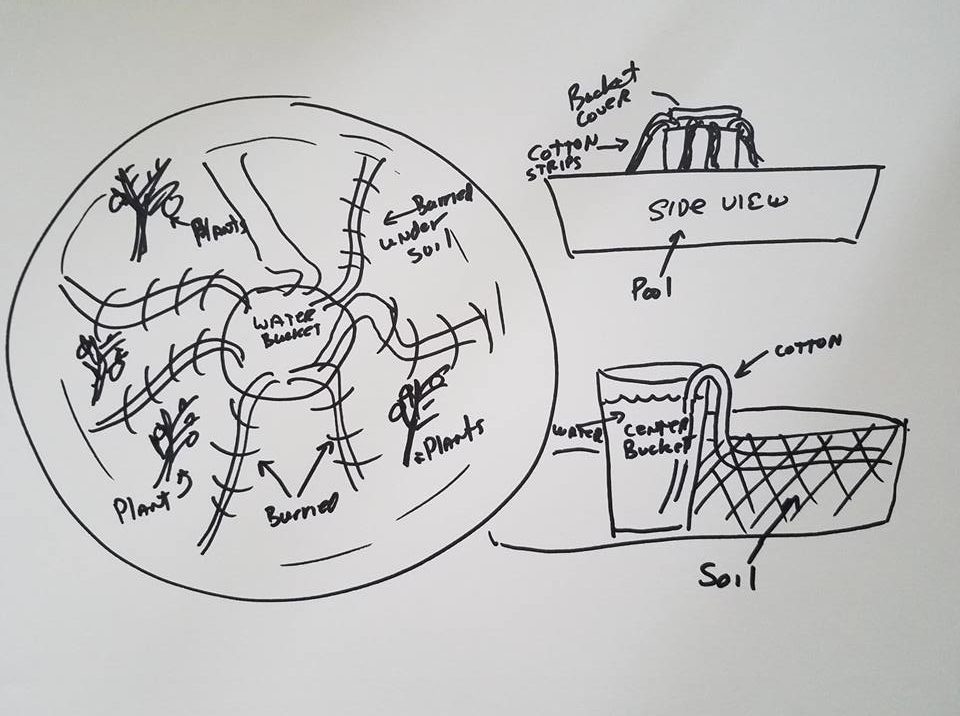
The drawing above shows how the reservoir, 5 gallon bucket goes in the middle. Fill it with water and place one end of the cotton towels or strips in the bucket, draping up and over the wall of the bucket and straight down again into the soil of the pool, then stretching across the pool (under the soil) to the far wall of the pool.
The water wicks up the towel, over the edge, into the pool and watering the soil (as needed) from below. You would plant your plants in between the towels. It’s amazing how the soil keeps moist this way.
You’ll have to continue checking your bucket to keep it full or if you want to automate it you can also connect it to a larger reservoir with a float as done in my previous kiddie pool system.
Get creative and let me know what you did. Happy Planting!
** If you have any comments, additions or information to improve the plans please let me know in the comments below. Also if you just want to say hey… 🙂